When you create a python program and you want to share it with the world and you want them to run your script without having to install python. You can do this by converting the .py file to .exe file. In this article, I will show you how you can do it.
You can refer to the YouTube video Tutorial for better Understanding!
Repository for Ultimate Resource in python. Drop a star if you find it useful! Got anything to add? Open a PR on the same!
I recently created a digital clock with python using Tkinter. I am going to use the same program to demonstrate the conversion of .py file to .exe file.
What will be covered in this Blog:
- What is an executable file?
- Types of executable file formats
- how to convert .py file to .exe file
What is an executable file?
In computing, executable code, executable file, or executable program, sometimes simply referred to as an executable or binary, causes a computer " to perform indicated tasks according to encoded instructions".
Unlike a data file, an executable file cannot be read because it's compiled.
A file with an executable file extension means that the file format supports some ability to run an automatic task.
If you wish to know more about it, You can use this link to navigate to its Wikipedia Page
Types of Executable Files
Note: Please exercise caution before opening any executable file, especially those received in suspicious emails or downloaded from unfamiliar websites. So, let's get started!
- Programs, Mac OS X applications, scripts, and macros are all considered executable files. Since these file types run code when opened, unknown executable files, such as those received as e-mail attachments should not be opened.
Use this link to navigate to list of executable file formats at Wikipedia Page
It's Time to code! You can find all the code at my GitHub Repository.
how to convert .py file to .exe file
Install the necessary packages.
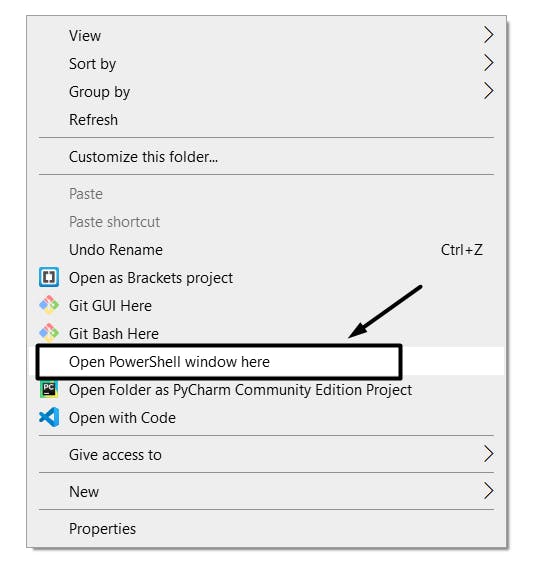
Open the folder where you will find the python script which you will convert to .exe file
Press Shift and hit Right-click

Select Open power shell window here
Next, run the following command in your terminal.
pip install pyinstaller
PyInstaller bundles a Python application and all its dependencies into a single package. The user can run the packaged app without installing a Python interpreter or any modules. PyInstaller supports Python 3.5 or newer.
PyInstaller is tested against Windows, Mac OS X, and GNU/Linux. If you wish to know more about it, Use this link to navigate to its documentation. Once the necessary package is installed, let's move forward!
converting .py file to .exe file
pyinstaller -w -F -i "C:\Users\imar\OneDrive\Desktop\YouTube Tutorial/pytoexe/icon.ico" clock.py
Let's Understand this now.
Once the command runs successfully, the executable file will get created inside dist folder.
Flags:
-w : When you run the executable file, a terminal window will get opened at the back while the executable runs. To prevent this from happening. you can use
-wflag.-F : When you convert your
.pyfile to.exefile, it comes with a lot of other dependencies. The dependency files will be created along with the.exefile inside thedistfolder. So this flag gives you the power to bind all the dependencies into a single file instead of multiple ones.
This comes in handy as if you wish you wish to share your program file to someone you would want to give them a single file rather than sharing a folder containing the .exe file along with a bunch of other dependency files.
- -i : This flag is used if you wish to add an icon to you
.exefile.
Note: The icon must be in .ico format only. You can use this link to navigate to a website that does this job for you or you can use any other website of your choice to perform this task.
- You need to specify the path of your icon with this flag in order to set the icon of your executable file.
Finally hit enter and run the command. A new dist folder will be created which contains your executable file. Note that now no terminal window opened at the back, no separate dependency file is generated and you have your icon for the application.
That's it. we are done! Simple isn't it?
You can find all the code at my GitHub Repository.
If you have any queries or suggestions, feel free to reach out to me.
You can connect with me on Twitter.
You should definitely check out my other Blogs:
- Python 3.9: All You need to know
- The Ultimate Python Resource hub
- GitHub CLI 1.0: All you need to know
- Become a Better Programmer
- How to make your own Google Chrome Extension
- Create your own Audiobook from any pdf with Python
- You are Important & so is your Mental Health!
Resources:
- pyinstaller.readthedocs.io/en/stable
- en.wikipedia.org/wiki/Executable
- en.wikipedia.org/wiki/.exe
- en.wikipedia.org/wiki/Category:Executable_f..
See you in my next article, Take care!
