Screenshot Taker with Python

In this Blog article, we will see how to Capture a Screenshot . We will see the implementation in python.
Repository for Ultimate Resource in python. Drop a star if you find it useful! Got anything to add? Open a PR on the same!
You can refer to my YouTube video tutorial for better Understanding
Introduction
Screenshot, also known as screen capture, is a digital image that shows the contents of a computer display. A common screenshot is created by the operating system or software running on the device. Taking, saving, and sharing screenshots can be extremely helpful.
What will be covered in this Blog
1. PyAutoGUI Introduction
2. How to capture Screenshot using python
What is PyAutoGUI?
PyAutoGUI lets your Python scripts control the mouse and keyboard to automate interactions with other applications.
Features
- Moving the mouse and clicking or typing in the windows of other applications.
- Sending keystrokes to applications (for example, to fill out forms).
- Take screenshots, and given an image (for example, of a button or checkbox), find it on the screen.
- Locate an application’s window, and move, resize, maximize, minimize, or close it (Windows-only, currently)
- Display message boxes for user interaction while your GUI automation script runs.
If you wish to know more about it, you can refer to PyAutoGUI Documentation. Use this link to navigate to the documentation.
Now that you are aware of PyAutoGUI basics, we can move forward to the coding section.
Time to code!
You can find all the code at my GitHub Repository. Drop a star if you find it useful.
Installing PyAutoGUI
Open your terminal and run the following command
pip install PyAutoGUI
Now that we have the package, we are ready to import it in our python script.
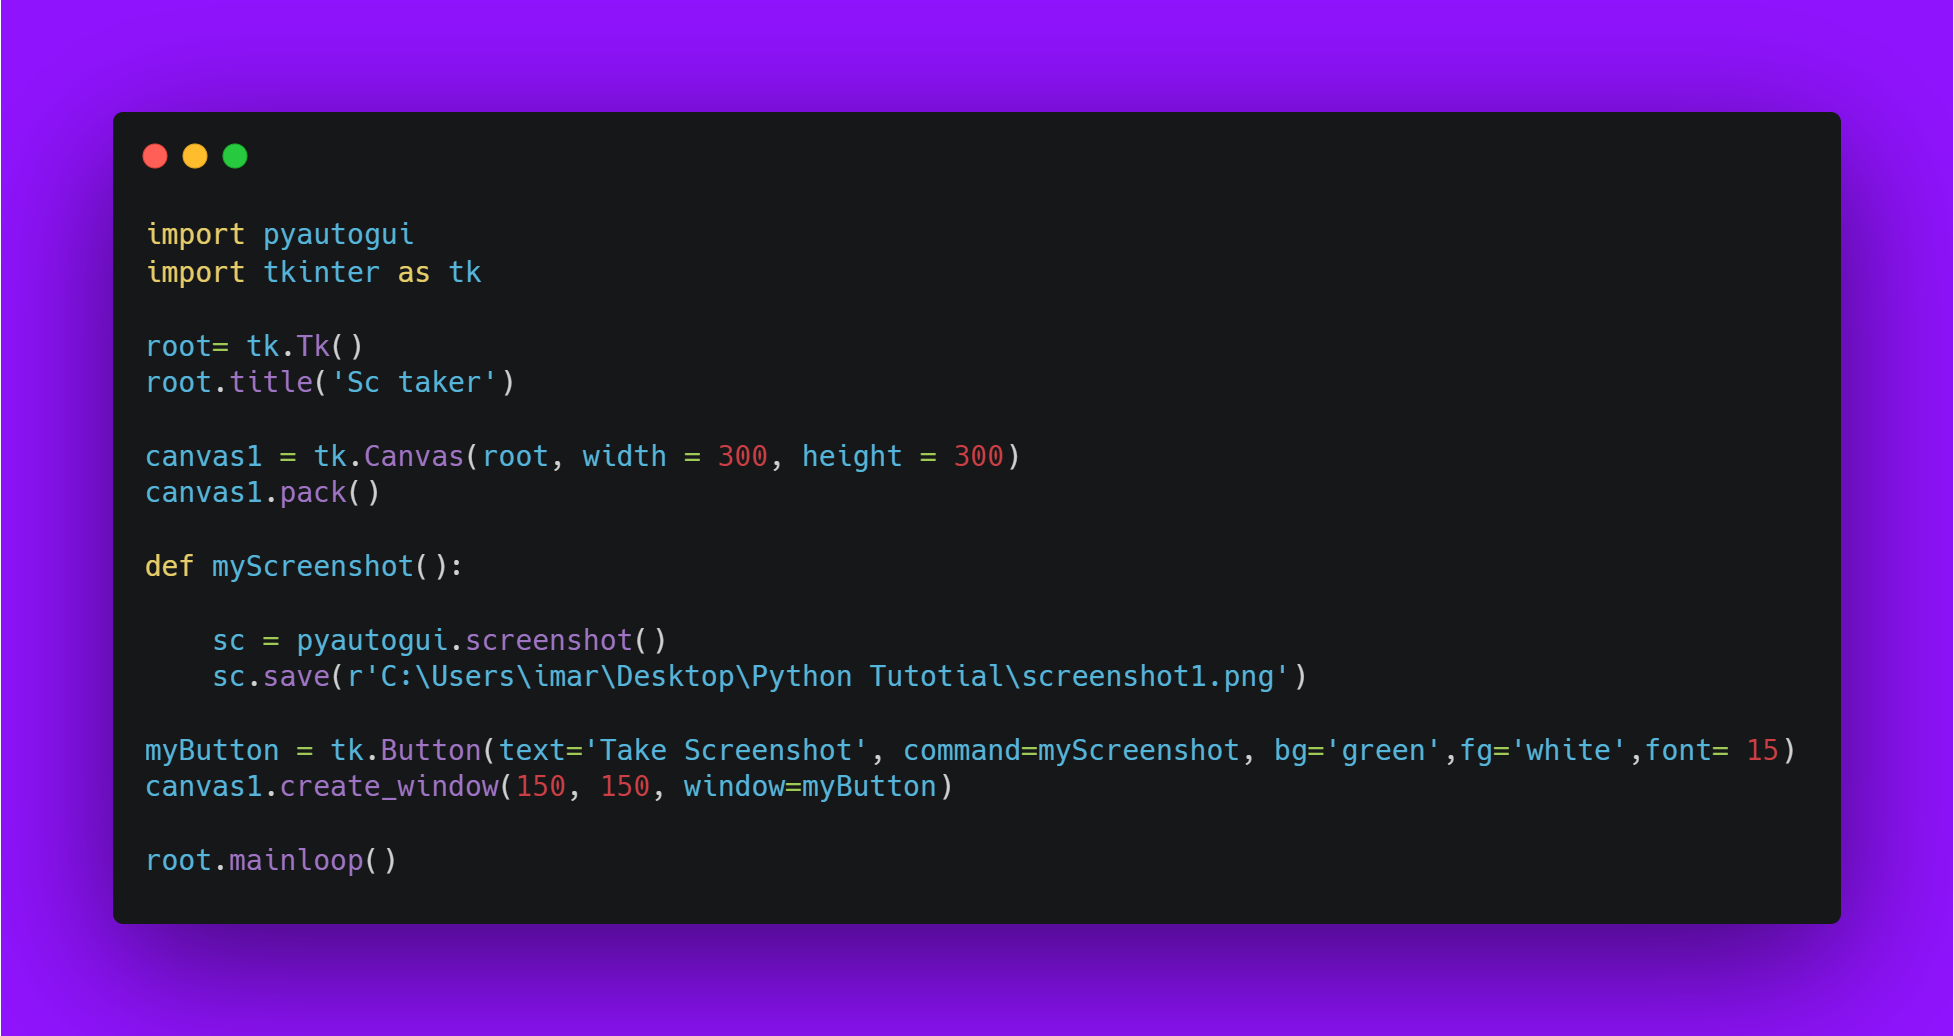
import pyautogui
import tkinter as tk
Now, its time to create a canvas. Let's give it a title. I am setting Sc taker as the title using the title method. You can specify the canvas dimensions. I am setting the height and width as 300.
root= tk.Tk()
root.title('Sc taker')
canvas1 = tk.Canvas(root, width = 300, height = 300)
Now, let's pack our Canvas using the pack method.
canvas1.pack()
Now that we have our canvas ready, lets define a function to capture screenshot. I am naming it as myScreenshot.
We need to create an object to store our screenshot. I am naming it as sc. So, we will call screenshot method from PyAutoGUI on sc.
def myScreenshot():
  myScreenshot = pyautogui.screenshot()

  myScreenshot.save(r'C:\Users\imar\Desktop\Python Tutotial\screenshot1.png')
Let's save our screenshot using the save method,. Give proper path along with the screenshot name.
Now, let's create a button and specify few parameters.
- I am setting the
textof the button asTake Screenshot. - I am passing my function
myScreenshotincommand. Backgroundandforegroundcolor asgreenandwhiterespectively.- And finally, I am setting the
fontas15.
myButton = tk.Button(text='Take Screenshot', command=myScreenshot, bg='green',fg='white',font= 15)
Now that our button is ready, let's put it in the center.
canvas1.create_window(150, 150, window=myButton)
At last, we will call our mainloop.
root.mainloop()
Our Python script is ready. Run the program and you will see something like this.
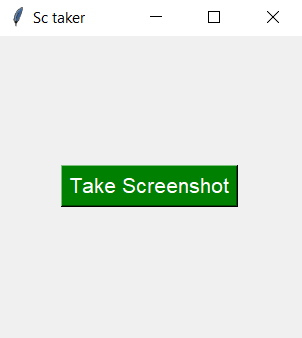
When you click the Take Screenshot button. A new screenshot will be captured and saved in your specified path.
That's it! simple, isn't it?
You can find all the code at my GitHub Repository. Drop a star if you find it useful.
Thank you for reading, I would love to connect with you at Twitter.
Do share your valuable feedback and suggestions!
You should definitely check out my other Blogs:
- Python 3.9: All You need to know
- The Ultimate Python Resource hub
- GitHub CLI 1.0: All you need to know
- Become a Better Programmer
- How to make your own Google Chrome Extension
- Create your own Audiobook from any pdf with Python
- You are Important & so is your Mental Health!
Resources:
- https://pyautogui.readthedocs.io/en/latest/
See you in my next Blog article, Take care